Music, Movies, and Warez, Three things that the modern student loves. Normally these non-DMCA materials are supplied via Bit-torrent or if you consider yourself highly skilled, via an FTP or News net server. However this can be sightly daunting for the less advanced among us. Solution, search for open shares.
Now there are two ways too do this, the “l33t” way and the Script kiddy way. I started off with the former, but settled into the latter when I realized how ridiculously easy it was. Either which way your going to need some tools.
First decide, are you a “
Script Kiddy” or a “
l33t haxor”?
Now that we got the tools out of the way, lets spilt the article
The Script Kiddy way
- Download and install MerX network scanner, always remember, (anything we tell you to get, scan it for viruses first, it never hurts.)
- Discover what your computers IP address, there a couple of ways to do this, easiest is to go to Start > Run, and type in “ipconfig”. It should look something like this.
192.168.1.145
The highlighted section of this is your subnet. Now depending on your network setup, your subnet, may or may not contain all the computers on your campus network. Now to make things “quick” we’ll start with scanning your subnet, as the total number of computers on it is limited to 64,770 (255 x 254).
- Open MerX, and look at the bottom pane, you should see a tab labeled “share – scanner”. I would advise that you search 254 addresses at a time; you can scan the whole network, however this takes more time. Depending on your Subnet you should scan from the xxx.xxx.xxx.1 to xxx.xxx.xxx.254. Select “smb”, and hit “start scan”. Then go find something to do for a few minutes.

- 4. When you return, the program should present you with a list of “Samba file shares” if it found any at all. Now many of these will be people that have enabled printer sharing, so their shares only contain print drivers, however luckily MerX lists the number of shared files, but that’s not the best part. Goto the “filesearch” tab. Select the files you want to search for and hit search.
- If everything worked, this is what you should see. Simply right click on the files and hit Download, Navigate to the Download tab on the top pane and click “start download” to begin you transfer. Thanks to the fact that this isn’t over the internet expect your media to arrive on your desktop in a few minutes, depending on the volume of network traffic. The program supports download pausing, and multiple downloads, so enjoy.

Tips:-
- Don’t forget to save your list of scanned addresses, with the File > Save option; This will save you having to scan them again.
- To find other shares simply change the 2nd (xxx.yyy.xxx.xxx.)and 3rd (xxx.xxx.yyy.xxx)numbers of the IP address to gain access to more files
- Remember that it only scans PC’s that are on at the time of scanning, so make sure you try the same ranges of IP at different times of the day
- Lastly unless your IP is generated dynamically, it would be advisable to manually change your IP address when you do this. It won’t completely cover your tracks, but in case someone’s firewall alerts them to your presence it should at least slow them down from being able to track your DMCA breaking behind, down
The L33T way
So if you think your good enough, there is another way, it’s a lot more in depth, and will help a bit when it comes to the finer operations. For the purposes of this section I’m going to assume you know a little something about
Unix based systems. Only the L33t use Linux, unless you actually like Linspire… Personally if your not sure which distro to use, I would highly recommend a
Debian based distro,
Ubuntu 5.10 being my favorite
- Go and fetch yourself a copy of Nmap, download it, Apt-Get it, whatever, just get it
- Based on your IP address, work out your subnet. Normally the last three sets of numbers. If you IP is 192.168.1.145, then you subnet would be 192.168.1.1 to 192.168.255.254. Now we don’t want to go crazy, scans take time, so scan in groups of 254 addresses
- Open a Terminal (unless you stuck with windows) and type “nmap” it should return a list of instructions of how to use this wonderful piece of technology
- Now there are a few commands that you could use.
nmap -sP : Ping Scan
nmap -sS : Steath scan (A scan without pinging first)
nmap -sV : Version scan (looks for program versions, on listening ports)
nmap -O : Finger printing (Discovers what OS is on target machine.
nmap –help : this will show you all the other comands availible.
I recommend using the command “nmap –sP” at first, because it's faster and won't try to scan IP's that don't exist. However bare in mind, that these commands don't have to be used individually. Eg. “nmap -sP -O 192.168.1.1”
Either which way, expect to wait for a while. So walk away from your computer and twiddle your thumbs for a few minutes, (depending on the number of addresses this could easily take half an hour).
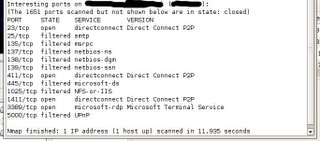
- When you return, you should a nice list of IP’s that looks something like this, depending on what commands you entered.

(Apologies for the messy blackout's but IP's and hosts must be protected, sort of...)
Here’s the fun part, now you get to go though the list and try identify which PC’s will be most likely to have open shares, FTP servers, DC++ host’s etc. based on which ports they have open and what OS they are running. To discover what programs use what ports just google “port #” + port “ or use the “-sV” option as show here.

- Finally either use the GUI or a terminal to mount and browse the share, enjoy.
In my Experience, Mac/Apple users are a waste of time(for this method), the fact that they have a mac, means they can afford
not to pirate stuff, It’s the digital divide; plus they tend to not be accessible. Linux users are normally quite advanced, and will normally only have a share OSS software, not that there is anything wrong with that, but it’s not Lost now it is? That leaves one group…
Now why have I told you to do this, why didn’t I tell you to go and get something like “
SMBspy”. Because Nmap will not only tell you what ports are open, but what OS each pc is running. Cool, for a couple of reasons. One if you so wish, you can try and discover exploits to gain access to various features on the “target” system. Such as a
VNC server, or a
HTTP server etc. Learning to do things yourself, or writing bash scripts to do it for you, are part of being a hacker, downloading MerX and double clicking aren’t, so in case you missed that,
MerX isn’t the solution to everything.
And in case you were wondering, unless the person you accessed/hacked has a software firewall like Zone Alarm, they will never know that you accessed their computer (there are more advanced ways to discover your intrusion, but basically that statement holds true).
Hopefully you can now enjoy the fine array of non-pornographic media you were able to obtain. And remember if you can do it, that means someone else can, the amount of times I’ve come across people that have shared their entire C:/ drive with Read & write access is frightening, I even left a message saying “Hacked” on one guys Desktop instructing him to get a firewall, and turn off “file and print sharing”, he didn’t listen, please do.
Veritech


